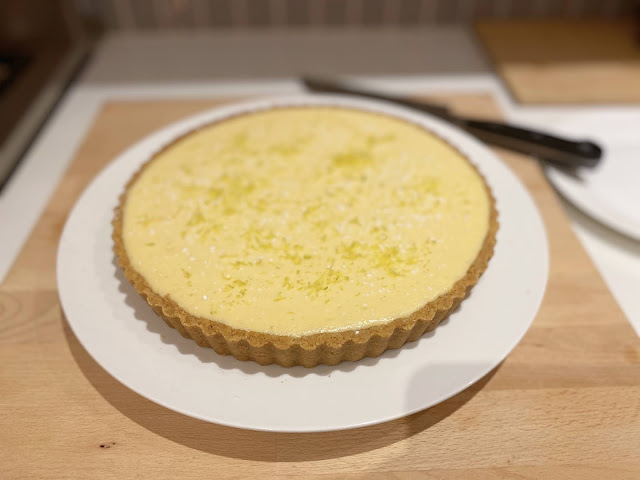
Friday, August 5, 2011

Crème Caramel from Rockpool


I LOVE custard, creme brulees and creme caramel the same! I came across this recipe from the Rockpool website, recipe taken from "The Food I Love’ by Neil Perry. I just had to try it out this weekend and I LOVE IT! hence, it is my new post!

This is the first time I made it and it turned out beautifully. It was creamy and tasted delicious and not too "eggy"...

Serves 6

Ingredients

1 litre milk
115g caster sugar
1 vanilla bean pod, split lengthways and seeds scraped out
6 eggs
6 egg yolk

For the caramel
225g caster sugar

Method

Combine the milk, sugar and vanilla bean and seeds in a saucepan and bring slowly to the boil. Remove the pan from the heat and leave to stand for 1 hour to infuse.

Meanwhile, to make the caramel, bring the sugar and 125ml warm water to a gentle simmer, stirring briefly to dissolve the sugar. Do not stir once it is simmering. Watch the sugar and water carefully, and simmer only until it starts turning a deep caramel colour. Immediately remove the pan from the heat and carefully pour equal amounts of the caramel into six moulds. Hold the moulds at the top of the rim and swirl to coat the moulds halfway up their sides with the caramel. Set aside.

Preheat the oven to 190°C. Lightly mix the eggs and yolks in a bowl. Strain the cooled milk mixture into the egg mixture, slowly whisking. Strain again and pour into the moulds. Lay a tea towel on the bottom of a roasting tin or bain-marie that is deeper than the moulds. Put the moulds in and half fill the tin with hot water. Cover the tin with foil and place in the centre of the oven and cook for 30-55 minutes, or until set. (The time will vary depending on the oven.) Allow to cool, then store in the refrigerator.

Pour some boiling water into a bowl and place a mould in the water for about 15 seconds. Carefully run a knife around inside of the mould. Place the serving plate on top and quickly upturn the crème caramel and slowly remove the mould, allowing the caramel to gently spill down the edges of the dessert. Serve immediately.

*Tip: You must cook this in a bain-marie half filled with water, and you need to have a cloth or tea towel in the bottom to stop the bottom of the moulds feeling direct heat; this can cause air bubbles to form as well.

Friday, July 29, 2011

Vanilla Slice ~ the prelude


It's always very daunting for me when I make custard, it's just way too easy to over cook the custard and have it curdled. Since I've never made vanilla slice before, I thought I ought to at least use the custard powder as my first attempt before using real egg yolks. Surprising, I really love the taste of this vanilla slice! :D

Ingredients:
2 sheets puff pastry
1/2 cup (110g) caster sugar
1/2 cup (75g) cornflour
1/4 cup (30g) custard powder
2 1/2 cups (625ml) milk
30g butter
1 egg yolk
1 teaspoon vanilla extract though I think vanilla paste or vanilla pods are much much better!
3/4 cup (180ml) thicken cream

Passionfruit icing
1 1/2 cups (240g) icing sugar
1 teaspoon soft butter
1/4 cup (60ml) passionfruit pulp (about 3 passionfruit)

Directions:
1. Preheat oven to 220C
Grease deep 23cm-square cake pa; line with baking paper extending paper 10cm over sides of pan.

2. Place each pastry sheet on separate greased oven trays. Bake 15 minutes; cool. Flatter pastry, put one pastry sheet in pan, trim to fit.

3. Combine sugar, cornflour and custard powder in pan; gradually add milk, stirring until smooth. Add butter, stir over heat until mixture boils and thickens. Simmer, stirring, 3 minutes or until thick and smooth. Remove from heat; stir in egg yolk and extract. Cover custard with plastic wrap; cool.

4. Make passionfruit icing: Stir ingredients in heatproof bowl over pan of simmering water until icing is spreadable.

5. Beat cream in small bowl with electric mixer until firm peaks form. Fold cream into custard, in two batches. Spread custard mixture over pastry in pan. Top with remaining pastry, trim to fit; press down slightly. Spread pastry with icing; refrigerate 3 hours or overnight.

Enjoy ;D

Monday, June 20, 2011

Japanese cotton soft cheesecake


This is definitely one of my favourite cheesecake recipes...very easy to make and it tastes delicious and light!

Ingredients:
140g / 5 ozs fine granulatd sugar
6 egg whites
6 egg yolks
1\4 tsp cream of tartar
50g / 2 ozs butter
250g / 9 ozs cream cheese
100 ml / 3 fluid ozs fresh milk
1 tbsp lemon juice
60g / 2 ozs cake flour /superfine flour
20g / 1oz cornflour
1/4 tsp salt

Directions:
Pre heat oven 160C

1.Melt cream cheese, butter and milk over a double boiler. Cool the mixture.Fold in the flours, egg yolks, lemon juice, 1/4 tsp salt and mix well.

2.Whisk egg whites with cream of tartar until foamy. Add in the sugar and whisk until soft peaks form.

3.Add the cheese mixture to the egg white mixture and mix well. Pour into a 8 inch round cake pan ( Lightly grease and line the bottom and sides of the pan with greaseproof baking paper or parchment paper.)

4. Bake cheesecake in a water bath for 1 hours 10 minutes or until set and golden brown at 160 C (325 F).

*note: add whipped cream to finish makes it even yummier!

Saturday, September 25, 2010

Fluffy pikelets


I'm really loving these fluffy pikelets for breakfast, these are slightly different to the Mixed Berry Pancake with fresh Strawberries in my earlier post but it's just as if not more delicious. I love the fluffy texture and it's super easy you can't go wrong!

Ingredients:

2/3 cup Self-raising Flour
1 Tablespoon Caster Sugar
3/4 cup Buttermilk or more if required!
1 Egg
Butter

Directions:

1. Sieve flour and sugar into a large bowl. Whisk buttermilk and egg in another bowl until combined. Add to the flour mixture and whisk until a smooth batter forms.

2. Melt some butter in a frying pan over a medium heat. Drop desired amount of mixture into the pan. Cook until bubbles form on top and golden underneath. Turn and cook until golden on the other side. Transfer to plate.

Butterscotch Sauce

1. Place ¼ cup brown sugar and a ¼ cup thickened cream and 1 ½ tablespoon butter in the fry pan. Stir over a medium-low heat until the sugar has dissolved. Increase the heat and bring to the boil then simmer until thickened slightly.

Sunday, June 6, 2010

more macaroons...


It must be because I think I have a recipe down pat that they begin to fail! After my successful macaroon story, my last two attempts of making more macaroons failed miserably.
Could it be because I left the egg whites longer than 3 days in the fridge?
Or was it because I used liquid food colouring in the egg whites?
Or was it because I made soup during the day and my kitchen had too much moisture in the room.

One reason why it failed was because the macaroon mixture would not dry, even though it was more than two hours after I've piped them. Suspecting that it wouldn't rise, I put them into the oven anyway and sure enough, they turned out flat like pan cakes (they still tasted pretty yummy though).

Just as I was ready to try again, I was hanging about killing time in Borders while waiting for friends. Wondering through the magazine aisles, these colourful, beautifully formed, delicious looking macaroons on the cover of a magazine caught my eye. It was the Woman's Weekly macaroon and biscuit magazine with lots of tips on how to create the perfect macaroon and biscuits. Without a thought I scan through the section to look for the answer...

One tip which really stood out was the beating of the egg whites.
The magazine suggested the egg white should be whisked at slow speed until soft peaks are formed. Then gradually add the sugar and increase the speed until stiff peaks.
I followed this instruction and the macaroons turned out well although, the macaroon mixture still took a while to dry but it eventually did after 1 hour.
Here is the result...my green tea macaroons with rose flavour butter cream center! :D

Monday, February 1, 2010

Macha macaroons


Green tea flavored macaroons filled with Buttercream Icing

As many times I'd failed at making creme brulee, I failed just as many times making macaroons! Both are my favourite desserts and to me, they go hand in hand as one requires only egg yolks while the other requires only egg whites. Therefore, it only makes sense to make macaroons followed by creme brulee...

I never thought macaroons were that difficult to perfect and yes, I'm pleased to say while I've perfected my creme brulee, at the same time, I have also perfected my macaroons after the 10th attempt!! Though it doesn't look as nice but, if I must say so myself, I think they taste just as nice as those purchased from the Lindt cafe! (and DH even agrees) ;D

Ingredients:

2 ¼ cups icing sugar
2 cups almond meal (I've opted for natural almond meal instead of bleached)
2 tablespoon caster sugar
5 egg whites (at room temperature)

Directions:

3 days prior to baking the macaroon, separate the white from the egg yolk. Place in the fridge and cover with paper towel. On the day of baking, remove from the fridge and allow egg white to reach room temperature before whisking.

Whisk egg whites until it reaches soft peak, gradually incorporate the caster sugar while beating. Continue to whisk until a stiff peak is achieved.

Add 1/3 of the sifted almond meal and icing sugar into the egg white. With a spatula, mix the mixture, add the remaining 2/3 of the mixture as you go. Continue mixing until the mixture is well incorporated but do not over mix.

Pipe the mixture onto baking paper, leaving a gap of 2.5cm between each circle. Allow it to sit for at least half an hour to dry out the shell.

Pre-heat fan forced oven to 120 degrees celsius.

Before putting it into the oven, lightly touching the top of the piped macaroons mixture. It should not stick to your finger. Bake in the oven for 10-15 minutes.

To make the macha macaroons, add 2tbsp of green tea powder to the almond meal and icing sugar mix before adding it into the whisked egg whites. The green tea powder will give you that lovely natural green colour and it tastes great too! :D

Saturday, January 9, 2010

it's another creme brulee


I swear, my first attempt at making creme brulee must've been beginner's luck because since then, my creme brulees has been too runny so I ended up freezing them and turned them into ice-cream, they've been over cooked, curdled or just blahg! Now after my tenth attempt (and I'm not exaggerating - just ask DH as he's had to suffer my many failings by turning his stomach into a garbage bin), I decided that it wasn't me..it was the recipe!! hehe
So I scoured the internet for a 'no fail' creme brulee recipe and came across this fabulous blog "A table for two" and what a fabulous name too I must add! There and behold, I found THE PERFECT non-fail recipe!! Having said this, you'll probably try this at home and it won't work! tee hee..but to assure you, I've made this three times now and each time, it's been perfect!! muaawwwhh! bellissimo!!!

Ever since DH and I had our wedding at the Werribee mansion where we had the best creme brulee dessert EVER and I really mean EVER because everyone scraped and licked their ramekins clean! Now, anytime someone mentions my wedding, there will be no doubt that someone's face will light up and mention THE creme brulee! Now to give you an idea, this creme brulee was very sweet but had a tinge of bitterness from the brulee, it was silky smooth and creamy like thick creamy custard just as described by ATFT...ops, just salivated on my keyboard! LOL

Well, this creme brulee is pretty much what was served at our wedding and I'll be surprise if it's not the same recipe...I hope you enjoy it as much as me because after this, I'm so pleased to say my search for THE creme brulee recipe is over! THANK YOU ATFT!! :D

Ingredients

(make 3 creme brulee on 4Oz ramekins)

1. 1 ¼ cups heavy cream
2. ½ cup full cream milk
3. 5 large egg yolks
4. 1 / 3 cup sugar
5. 2 tsp pure vanilla extract

Methods

1. Preheat the oven to 95ºC and line up 3 ramekins on a baking tray.
2. In a mixing bowl, whisk the egg yolks, sugar, and vanilla extract until combined but not airy.
3. Bring the cream and milk just to a boil.
4. Still whisking, pour in about one quarter of the hot milk – this will temper or warm, the yolks so they won’t curdle.
5. Whisking all the while, slowly pour in the remainder of the cream and milk.
6. Give it a stir and make sure all the sugar are melted.
7. Then strain it into the ramekins. Tap the ramekins on the counter to let all the bubbles out, and scoop out the froth on top with a spoon if necessary.

8. Put it in the oven and bake for 50 to 60mins.
9. Tap the side of the ramekins and see whether the centre are set. If it wobbles too much, then it needs to cook a little longer. If it is firm, then you have overcooked them. If it wobbles a little, they are ready as they will still continue cooking while cooling down on the rack.
10. Once they reach room temperature, cover each custard with plastic wrap and put in the refrigerator for at least 3 hours! The longer the better.

The Cheat – Caramelised sugar topping
1. Add 1 cup of castor sugar and 2 tbsp of water in a saucepan on medium heat.
2. Once all the sugar melted, turn it on high heat and let the sugar caramelised.
3. Once you notice the sugar is turning yellow, remove from the stove quickly as it will continue to caramelise in the extreme hot saucepan, so take extra precautions here.
4. Pour a small amount of the caramel on top of the chilled custard.
5. Quickly tilt and swirl the ramekin and let the sugar coats the top of the custard evenly.

Enjoy! :D

Friday, January 1, 2010

Vietnamese cold noodle salad


I love having my friends KW and Seto over for meals because KW takes the most amazing photos and makes my food looks doubly yummy!!!
Here is my Vietnamese cold noodle salad DH and I made, a perfect dish for a hot Summer's day...sauce recipe compliments of a Vietnamese friend.

COLD VERMICELLI SALAD
Ingredients:

Vermcelli noodle enough for 4 servings
beanshoot
mint thinly sliced
lettuce thinly sliced
crushed peanuts (roasted)
deep fried spring rolls (if preferred you can use grilled meats or peel cooked prawns too)

Directions:
Place all ingredients into a bowl including the pickled vegetables. Just before eating, pour the fish sauce dressing and mix well.


FISH SAUCE DRESSING
Ingredients:

1 whole lemon to fill 1 cup
1 cup of fish sauce
1 cup of caster sugar
1 glove of garlic crushed
1 small red hot chili

Directions:
1. Squeeze lemon and fill to 1 cup
2. Add fish sauce and caster sugar to lemon juice and stir until sugar have dissolved.
3. Add crushed garlic to sauce
4. Add dices red chilies to sauce
*you can use this dipping sauce for fried spring rolls too


PICKLE SAUCE
Ingredients:

1 glove of garlic crushed
1 small red hot chili
3 tbsp white vinegar
3 tbsp fish sauce
1 tsp salt
enough sugar to soak vinegar
1 cucumber
1 carrots

Directions:
1. Pour vinegar into a bowl
2. Add enough caster sugar to cover the vinegar in the bowl
3. Add fish sauce to sugar and vinegar and stir until sugar have dissolved
4. Peel vegetables and slice thinly and soak in vinegar mixture for approximately 30mins.
*discard sauce when ready to serve

Thursday, November 26, 2009

My pandan chocolate cake...


I just had to try this Simple Buttercream Icing by The Culinary Institute of America and it is absolutely delicious!!! I've placed it in between a layer of chocolate cake (bottom) and pandan cake (top). I'd modified a Pandan cake recipe and overall, I thought it wasn't too bad but for people who loves dark chocolate like DH and friends, they loved it!! What I like about this recipe is how moist the chocolate layer is...

I'd used Green&Black's organic 70% dark chocolate instead of cocoa powder and next time I think I'll just make the chocolate layer and leave the pandan layer out as I thought the chocolate overpowered the pandan flavour and smell.

Here's the recipe for dark chocolate lovers out there:
Ingredients:

150g plain flour
1/2 tsp baking powder
1/4 tsp salt
8 eggs
400 ml coconut milk
125g butter, softened
2 tbsn pandan juice
160g castor sugar
12 tsp pandan essence
1 tbsn caster sugar
1/2 tsp cream of tartar
100g Green&Black organic black chocolate 70% cocoa - if you don't like your chocolate bitter, you may want to use milk chocolate instead of black chocolate.

Directions:
1. Preheat oven to 160C/350 f (convection)
2. Pour the coconut milk into a saucepan and add castor sugar (160g). Bring to a boil, stirring slowly to dissolve sugar. Set aside to cool.
3. Sieve the cake flour, baking powder and salt and pour half of the mixture into another bowl
4. Chop the block of chocolate and melt using a bain-marie.
5. In a bowl, combine egg yolks, coconut mixture then pour half of the mixture into another bowl
6. Place pandan juice and pandan essence into one coconut mixture and combine well. Add one bowl of flour mixture and stir well.
7. Place melted chocolate into the other coconut mixture and combine well. Add one bowl of flour mixture and stir well.
8. Whisk the egg whites lightly and add in the cream of tartar and castor sugar (1 tbsp). Continue to whisk until the mixture is stiff. Split half into another bowl.
9. Gently fold half the beaten egg whites of one bowl into the pandan mixture and blend well. Then fold in the remaining egg whites and work very lightly with a spatula.
10. Gently fold half the beaten egg whites of the other bowl into the chocolate mixture and blend well. Then fold in the remaining egg whites and work very lightly with a spatula.
11. Place the mixtures into two cake tins ( greased and floured for easy removal ) and bake in the oven for about 45 minutes or until skewer comes out clean
12. Remove cake from oven and allow to cool on a rack.
13. When cake is cool, spread the Simple Buttercream Icing in between the chocolate layer and pandan layer. Decorate top of cake with more icing.

Thursday, November 12, 2009

I LOVE CUPCAKES!!


A CUPCAKE BOUQUET with the World's Premier Culinary College
Source: www.youtube.com
Get the recipe: http://www.ciaculinaryintelligence.com/2007/05/a-cupcake-bouquet-for-moms-special-day.html The Culinary Institute of America is the world's premier culinary college. Culinary school chef instructor Alison McLoughlin demonstrates how to create a floral bouqet out of cupcakes. ...

Orange Chiffon Cupcakes
Makes 1 dozen cupcakes

2 1/4 cups cake flour
1 1/2 cups granulated sugar (divided use)
1 Tbsp baking powder
1 tsp salt
1 cup freshly squeezed orange juice
1/2 cup vegetable oil
5 large egg yolks
2 Tbsp grated orange zest
8 large egg whites
1/2 tsp cream of tartar
Confectioners' sugar for dusting
Preheat the oven to 350ºF. Place paper cupcake inserts inside cupcake pan.

Sift the flour, 1 1/4 cups of the granulated sugar, the baking powder and salt into a large mixing bowl and set aside.

In a separate bowl, whisk together the orange juice, oil, egg yolks and orange zest. Mixing by hand with a spoon or rubber spatula, blend the wet ingredients into the dry ingredients. Continue to mix until the batter is smooth and evenly blended, about 2 minutes.

In the clean bowl of a stand mixer fitted with the whisk attachment, whip the egg whites on medium speed until they are foamy. Add the remaining 1/4 cup granulated sugar and the cream of tartar. Continue to whip until the whites from medium peaks when the beater is lifted about 4 minutes.

Using a rubber spatula, gently fold in 1/2 of the whipped whites into the batter. Gently fold in the remaining 1/2 of the whites into the batter.

Scoop the batter into the prepared cupcake pan and bake until a skewer inserted near the center of on of the cakes comes out clean and the cake springs back when lightly pressed with a fingertip, 15-20 minutes.

Allow the cakes to cool and remove from pan.

Variations
Lemon or Lime Chiffon Cup Cakes
Replace the orange juice with 10 Tbsp water and 6 Tbsp freshly squeezed lemon or lime juice. Replace orange zest with lemon or lime zest. Continue as directed.

Simple Buttercream Icing
Makes about 4 cups

1 cup (2 sticks) unsalted butter, at room temperature
4 cups confectioner's sugar, sifted, plus extra as needed
1 tsp vanilla extract
1/8 tsp salt
1/4 cup heavy cream or whole milk plus extra as needed
In a stand mixer fitted with the paddle attachment, cream the butter on medium speed until it is very light in texture, 2 minutes.

Add the confectioner's sugar, vanilla extract, and salt and mix on a low speed until the sugar and butter are blended, scraping down the bowl with a rubber spatula as needed.

Increase the speed to medium and, with the mixer running, add the cream in a thin stream.

Increase the speed to high and whip the buttercream until very smooth, light, and a good spreading consistency. Adjust the consistency if necessary by adding a bit more confectioners' sugar or cream.

Note: Once blended, buttercreams can be stored in the refrigerator for up to two weeks. To use after refrigeration, let the buttercream soften at room temperature for about 15 minutes. Transfer it to the bowl of a stand mixer and beat with the paddle attachment until it is a smooth, light spreading consistency, 3-4 minutes.

About Me

My Photo
Melbourne, Australia